Today's activity - Make your own Play-dough
This is a salt dough that you can use to sculpt. When it dries out, you can paint it too!
You will need 4 cups of flour, 4 cups of salt, 2 cups of water, and 1 teaspoon cooking oil.
Mix all ingredients together with your hands. Knead the dough for 5 minutes (that means to squeeze it and turn it over, and keep squeezing and turning). After that, it is ready to use! You should store any unused dough in a ziploc bag; make sure to squeeze out all the air before sealing.
If you make anything, send me a picture and I will post it here. mindiphipps@gmail.com
Monday, August 13, 2012
Friday, August 10, 2012
Friday, 10 August 2012 - Bingo!
Today's Activity - Bingo
Have you ever played Bingo at a party or with friends? It's a lot of fun, but after a few rounds, it can get kind of boring. So today, I am going to give you some tricks to liven up your next game of Bingo.
First of all, if you don't have a Bingo set, you can easily create your own Bingo game. First of all, you will need the numbers 1-75 to pick randomly from, and you will need Bingo boards and covers. To make some number, I recommend that you cut up some index cards into small pieces and put them in a bag, you can shake up the bag to mix them up, and not look when you reach in to pick them. You could also put stickers on pennies and write the numbers on the stickers. You will need 15 numbers for each letter: B1, B2, ...B15, I16 - I30, N31 - N45, G46 - G60, O61 - O75.
To make boards, you can just draw a grid and fill it in with random numbers (make sure to use numbers that belong in each column, for example, don't write 75 in the B column!). To get a 5x5 Bingo board, you need to make 4 vertical lines, and cross them with 4 horizontal lines. Write FREE on the center square.
For covers, you can just cut up a bunch of little pieces of index cards (colored would be nice), or use a bunch of pennies.
You are ready to play! Here are some different games you can play:
Standard Bingo - players compete to be the first to get 5 covered squares in a row, either vertically (up and down), horizontally, or diagonally.
Postage Stamp - players compete to cover the 4 squares in any of the corners of the board.
Plus sign - players try to cover all their N squares, as well a horizontal line that goes through the FREE space.
4 Corners - (you don't need to call any I, N, or G numbers for this game, if you pull one out, keep it out of the bag and just try again)
Railroad Tracks - cover the entire I and G columns
Diamond - cover all the N column, the middle 3 of the I and G columns, and the middle one of B and O.
Picture Frame - just cover the outside edge of the board
Black Out - try to cover the whole board (no picture required!!)
When people play Bingo, there are often "nicknames" for the different numbers that make calling the game more fun. Print out or memorize some of your favorites and your players will love it! And if you can think of any other good ones, email me and I'll put them on the list! mindiphipps@gmail.com
Have you ever played Bingo at a party or with friends? It's a lot of fun, but after a few rounds, it can get kind of boring. So today, I am going to give you some tricks to liven up your next game of Bingo.
First of all, if you don't have a Bingo set, you can easily create your own Bingo game. First of all, you will need the numbers 1-75 to pick randomly from, and you will need Bingo boards and covers. To make some number, I recommend that you cut up some index cards into small pieces and put them in a bag, you can shake up the bag to mix them up, and not look when you reach in to pick them. You could also put stickers on pennies and write the numbers on the stickers. You will need 15 numbers for each letter: B1, B2, ...B15, I16 - I30, N31 - N45, G46 - G60, O61 - O75.
To make boards, you can just draw a grid and fill it in with random numbers (make sure to use numbers that belong in each column, for example, don't write 75 in the B column!). To get a 5x5 Bingo board, you need to make 4 vertical lines, and cross them with 4 horizontal lines. Write FREE on the center square.
For covers, you can just cut up a bunch of little pieces of index cards (colored would be nice), or use a bunch of pennies.
You are ready to play! Here are some different games you can play:
Standard Bingo - players compete to be the first to get 5 covered squares in a row, either vertically (up and down), horizontally, or diagonally.
 |
| This shows the three ways to win standard Bingo |
Postage Stamp - players compete to cover the 4 squares in any of the corners of the board.
Plus sign - players try to cover all their N squares, as well a horizontal line that goes through the FREE space.
4 Corners - (you don't need to call any I, N, or G numbers for this game, if you pull one out, keep it out of the bag and just try again)
 |
| Here are the patterns for postage stamp (win with any 1 corner), plus sign, and 4 corners |
Railroad Tracks - cover the entire I and G columns
Diamond - cover all the N column, the middle 3 of the I and G columns, and the middle one of B and O.
Picture Frame - just cover the outside edge of the board
 |
| And here you see railroad tracks, diamond, and picture frame |
Black Out - try to cover the whole board (no picture required!!)
When people play Bingo, there are often "nicknames" for the different numbers that make calling the game more fun. Print out or memorize some of your favorites and your players will love it! And if you can think of any other good ones, email me and I'll put them on the list! mindiphipps@gmail.com
2.... One little duck
4.... B4 (Crowd says "and after")
5.... One little snake
7.... Lucky seven
11.. Chicken legs, skinny legs
12.. One dozen, The vitamin
13.. Lucky for some unlucky for others, baker's dozen
16.. Sweet sixteen
22.. Quack quack - Two little ducks, All the twos
24.. Two dozen
27.. Little duck with a crutch
33.. All the threes
44.. Droopy drawers - All the fours
50.. Hawaii five O, Hawaii (USA)
52.. Weeks in a year, 52 Pickup (USA)
55.. Snakes alive - All the fives - Double nickels
57.. Heinz varieties
75.. Big Daddy, Granddaddy of Bingo
Thursday, August 9, 2012
Thursday, 9 August 2012 - Popsicles
Today's activity - Make your own popsicles

To do this, you will need some paper dixie cups, popsicle sticks, and orange juice or Kool-Aid.
Pour orange juice into a dixie up until it is about 2/3 full. Put in a popsicle stick. Put in the freezer for a few hours or overnight.

To eat, you will want to tear the paper cup to get it off. It will be drippy so eat outside or over the sink!
Variation: To make striped posicles, pour in a layer of OJ or other juice until the cup is about 1/3 full, and put in a popsicle stick. Let freeze for an hour or two, until it has at least a layer of ice on top. Then pour in another color of juice on top.
Wednesday, August 8, 2012
Wednesday, 8 August 2012 - Codebreakers!
Today's Activity - Codebreakers!
Today's code is a different kind of code than last time. If you remember, last time we did a substitution code where each letter was used to indicate a different letter. This time, each letter will be replaced with a symbol.
To create your code key, first draw 3 tic-tac-toe boards. Leave the first one plain, but in he second one, make 1 dot in each section (for the first 2 rows, you will put it on the bottom of the section, on the bottom row, you need to put it at the top of the box since the bottom is open. In the third tic-tac-toe board, you will put 2 dots in each space.
 Next, you will fill in the letters of the alphabet, starting in the plain box. Go across the top row, then the middle, then the bottom, and then move on to the next tic-tac-toe board.


To use the code, you make the shape of your box including the dots if there are any. Here is an example of some letters:

On this card, I have written some names in code. Reply when you've figured out what the names are, and start using the code with your friends!

Today's code is a different kind of code than last time. If you remember, last time we did a substitution code where each letter was used to indicate a different letter. This time, each letter will be replaced with a symbol.
To create your code key, first draw 3 tic-tac-toe boards. Leave the first one plain, but in he second one, make 1 dot in each section (for the first 2 rows, you will put it on the bottom of the section, on the bottom row, you need to put it at the top of the box since the bottom is open. In the third tic-tac-toe board, you will put 2 dots in each space.


On this card, I have written some names in code. Reply when you've figured out what the names are, and start using the code with your friends!

Monday, August 6, 2012
Tuesday, 7 August 2012 - Race Track Game
Today's activity - Making a Race Track Game

You will need the following:
- 6 little toys or coins, something like Matchbox cars or Little People would be good
- A long sheet of paper, or several sheets taped together
- A marker and a straight edge (ruler)
- 5 dice
1. First, you need to make 6 "lanes" on your paper. Make sure the lanes are wide enough to have one of your little toys go through it. If you have a long paper, make the lanes go all the way down the paper. If you just have a few sheets of regular paper, tape them together first, then draw the lanes (otherwise the lanes won't match up). At one end of the racetrack, label the rows with the numbers 1 through 6. (My race track is bent from being folded, sorry!)
2. Next, you will make lines going across your paper to represent the steps your toy will get to take towards the end of the race track. I recommend your track be at least 12 spaces long, 20 would be fine, too much longer will make the races boring. Make sure the spaces end up being big enough to contain your toy racers.
You are ready to play! Place your racers so there is one in each lane. Roll the 5 dice. For each dice, the number that is face up gets to move one space. So if you roll 1, 2, 3, 3, 3, then the racer in lane 1 gets to move one space, the one in lane 2 gets to move one space, lane 3 gets to move three spaces, and lanes 4, 5, and 6 have to stay put. Pick up the dice and roll them all again. The first racer to go off the end of the track wins!

This is a good game to play at a party; you can have people pick which racer they think will win. You can even play a life size version at a party by taking a bunch of papers and laying them on the floor in 6 lanes. Have actual people stand on the first paper and move as you roll the dice.
 Variation: I like to put the dice in an empty and cleaned butter tub, and cover it with saran wrap. Then you can turn the cup over and shake up the dice, then turn it back and let the dice land in the bottom of the cup. You can look through the saran wrap to see them. This way, you don't have to worry about losing any dice! (This roll was 1, 2, 2, 5, 5)
If you make a racetrack, send in a picture and I will post it here!

You will need the following:
- 6 little toys or coins, something like Matchbox cars or Little People would be good
- A long sheet of paper, or several sheets taped together
- A marker and a straight edge (ruler)
- 5 dice
1. First, you need to make 6 "lanes" on your paper. Make sure the lanes are wide enough to have one of your little toys go through it. If you have a long paper, make the lanes go all the way down the paper. If you just have a few sheets of regular paper, tape them together first, then draw the lanes (otherwise the lanes won't match up). At one end of the racetrack, label the rows with the numbers 1 through 6. (My race track is bent from being folded, sorry!)
 |
| I made mine for a party, so I made the spaces with black tape so it would look nicer. I also added a Start and Finish line. |
 |
| Duck racers! |

This is a good game to play at a party; you can have people pick which racer they think will win. You can even play a life size version at a party by taking a bunch of papers and laying them on the floor in 6 lanes. Have actual people stand on the first paper and move as you roll the dice.
 Variation: I like to put the dice in an empty and cleaned butter tub, and cover it with saran wrap. Then you can turn the cup over and shake up the dice, then turn it back and let the dice land in the bottom of the cup. You can look through the saran wrap to see them. This way, you don't have to worry about losing any dice! (This roll was 1, 2, 2, 5, 5)
If you make a racetrack, send in a picture and I will post it here!
Monday, 6 August 2012 - Toast recipes
Today's activity - Cooking with Toast
There are many foods you can make starting with just a few pieces of toast. I will share some, and you should post any that you can think of. There are 2 kinds of toasters: a pop-up slice toaster, and a toaster oven that has a door and you lay the bread inside to toast. You will need a toaster oven to make these recipes.
With all these recipes, after you make the first batch of toast, you will need to adjust your toasting time or your bread will end up burnt. This is because the toaster oven will already be hot from the first round, and the bread will start toasting immediately. So run the toaster oven for a shorter time after the first round.
1. Toast and butter - just spread some butter on toast
2. Cinnamon Toast - after toasting, take out the bread and spread on butter or margarine. Then sprinkle some cinnamon sugar (NOT plain cinnamon) over the butter. Put it back in the toaster oven to melt the butter and cinnamon sugar together. You probably don't need to turn it on, it will still be warm from the toasting cycle. You will have to play with the amounts of butter and cinnamon sugar you use to get it just right for your taste.
3. Melted Cheese - toast a piece of bread, then put a slice of cheese on it. Return to toaster and toast again until cheese is melted. Watch it carefully so the bread doesn't burn! You can also put some butter or margarine on the toast before you put on the cheese.
4. Garlic Cheese Toast - toast bread, then spread on butter or margarine. Then shake on some garlic salt (NOT TOO MUCH), and grated or shredded parmesan cheese. Return to toaster and toast just until the butter is all melty and the garlic and cheese are melted into the butter.
5. Cream Cheese and Jelly Sandwich - I like to use toast for this because it makes it easier to spread the cream cheese. Toast 2 pieces of bread. Spread cream cheese on one side, and any flavor of jelly on the other. Sandwich them and eat.
So, do you have any favorite uses for toast? Reply with a recipe and let us all share something new!
Friday, August 3, 2012
Friday, 3 August 2012 - "Pyramid" solitaire
This is a trickier solitaire game than the "Clock" that I taught you last week. To play, all you need is a deck of cards.
Take out the jokers and shuffle your deck (see 8/2 post to learn how to shuffle). You will lay out cards in the form of a pyramid, so make sure you have enough space. This isn't a great game to play on your bed, especially if it is soft, because the cards need to stay in their formation.
Turn the top card face up and place it at the top of your playing surface. Then turn over the next card and place it so it is covering the bottom left corner of the first card.

Place the next card from the deck next to it, so you have a row of 2 cards. Lay out a row of 3 cards next, then 4, then 5, then 6, and then 7. Stop after your row of 7 and your pyramid should be shaped like this:

Now to play! Each number card is worth its face value, Aces are worth 1, Jacks are 11, Queens are 12, and Kings are 13. Your goal is to remove 2 cards that equal 13. You MAY NOT use a card that has anything on top of it; you may only remove "open" cards.
 Looking at the bottom of my pyramid, first I will remove the King, since it is worth 13. Cards that are removed get put in a face-up stack near the pyramid that we will call the discard pile. Then I will take off the 9 and 4 that are right next to each other. My 3 is on top of a 10, but that 10 is not open. Since I took off the King and the 9, I have an open 10 in that spot. I will remove the 3 and that 10. I can also take off a 6 and 7, but now I have no more cards to remove. Here's what it looks like now:
 Now I will start to work my way through the deck. Turn over the first card from the deck. If you can use it to remove something from the pyramid, great. If not, put it on the discard pile. I got a 10 in the game I am showing you, so I couldn't use it. Remember, Queens match up with an Ace to make 13, and Jacks can match up with a 2. You only get to go through your deck one time, so look carefully for matches. The goal is to get all the cards off your pyramid, but since it is pretty hard to win, you could also keep track of how many cards were left, and then when you play again, try to have fewer left. Below is a picture of how my game ended. I had 16 cards left. Can you beat that? Play one time and then let us know how you did!!

Variation: Instead of going through the deck one card at a time, you can deal three cards at a time. Turn them over as a stack and do NOT put them on your discard pile. You can only use the top one. If you use the top one, then the next one is revealed and you can use that one. When you can't use the top card, turn over the next group of three, again so you can only see and use the top one. When you have only 1 or 2 cards left in your hand, turn those over on the top of the deck pile. If you can't use one, you can pick up the cards left in the deck, turn it over (DO NOT SHUFFLE), and start going through them 3 cards at a time again. Keep going until you have nothing else you can do.
Take out the jokers and shuffle your deck (see 8/2 post to learn how to shuffle). You will lay out cards in the form of a pyramid, so make sure you have enough space. This isn't a great game to play on your bed, especially if it is soft, because the cards need to stay in their formation.
Turn the top card face up and place it at the top of your playing surface. Then turn over the next card and place it so it is covering the bottom left corner of the first card.

Place the next card from the deck next to it, so you have a row of 2 cards. Lay out a row of 3 cards next, then 4, then 5, then 6, and then 7. Stop after your row of 7 and your pyramid should be shaped like this:

Now to play! Each number card is worth its face value, Aces are worth 1, Jacks are 11, Queens are 12, and Kings are 13. Your goal is to remove 2 cards that equal 13. You MAY NOT use a card that has anything on top of it; you may only remove "open" cards.


Variation: Instead of going through the deck one card at a time, you can deal three cards at a time. Turn them over as a stack and do NOT put them on your discard pile. You can only use the top one. If you use the top one, then the next one is revealed and you can use that one. When you can't use the top card, turn over the next group of three, again so you can only see and use the top one. When you have only 1 or 2 cards left in your hand, turn those over on the top of the deck pile. If you can't use one, you can pick up the cards left in the deck, turn it over (DO NOT SHUFFLE), and start going through them 3 cards at a time again. Keep going until you have nothing else you can do.
Thursday, August 2, 2012
Thursday, 2 August 2012 - Shuffling cards
Today's activity - How to shuffle a deck of cards
Shuffling takes a LOT of practice, so you should dedicate quite a while to perfecting this skill. First you have to choose the right deck. It is best if you have a deck of cards that are kind of slippery when you rub them together. If you don't have a slippery deck, a regular deck will do fine too.
Take your deck and separate it into 2 smaller piles, hopefully about half a deck each. Hold each pile as shown below, with your thumb at one end, your middle finger at the other end, and your pointer pushing down on the middle of the stack.

Holding a stack in each hand, move your hands close enough together so that once the cards come out of your hand, they will cross each other slightly. Pressing with your index finger, let the cards slide off your thumb slowly (it will be hard to regulate the speed at first, but keep practicing) (the cards will bend down in the middle, and then start coming off your thumb). You don't have to worry about taking turns for each side; if you start them shooting off both thumbs, they will cross each other. Keep going until all the cards have gotten on the stack

When you look at the stack, you will probably see some big chunks on one side or the other (or both!). This is because you are just starting and shuffling takes a lot of practice. Pick up the crossed over cards and slide them together to get one pile. Now you are ready to cut the deck and shuffle again. Keep shuffling!

Variation: to get the cards back into one pile after shuffling them, you can do "The Bridge." You have to be good at shuffling first before you try to do this. When you shuffle the cards, you are bending them down each time, so the bridge helps to bend them back the right way. After you have shuffled them onto the table, DON'T let go of the ends. Pick up the stack by curling all your fingers (not your thumbs) over the free ends of the 2 stacks, and keeping both thumbs on the top of the stack. Push in from the sides to make it look like a rainbow shape. Then straighten out your fingers to they form a surface under the cards, and let them start shooting into your hands (if the cards are slippery, they will start shooting right away). This will make a not-quite-perfect deck that you can cut and start shuffling again. BE CAREFUL, if your thumbs are not right, all the cards will explode in the air like fireworks. And if your hands are not right or the cards weren't straight, they will all slide out the sides. THIS WILL HAPPEN TO YOU! Just keep practicing!
Wednesday, August 1, 2012
Wednesday 1 August 2012 - Mosaic Votive Holder

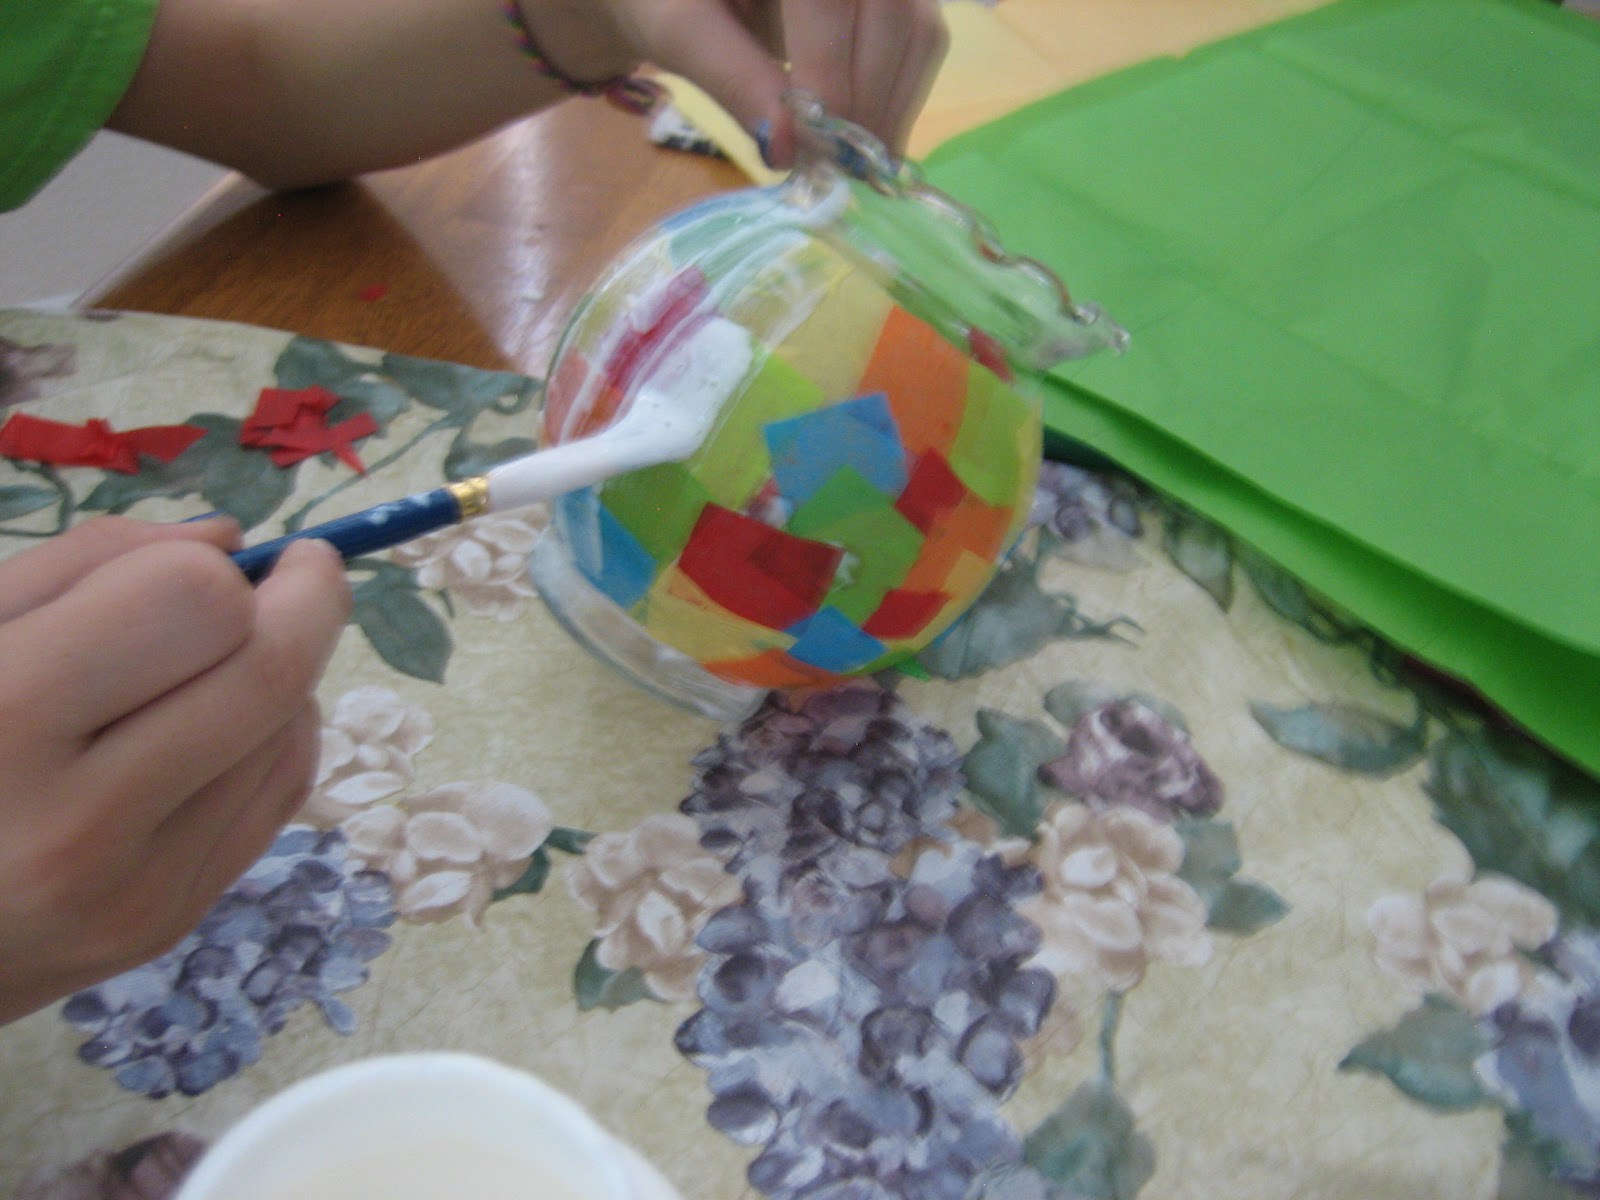
Today's Activity - Mosaic Votive Holder
Remember when I said we'd use that tissue paper again? Today is the day! You will also need white glue or Mod Podge, a paint brush for glue, and a glass votive candle holder or small glass cup.
Get out some pieces of colored tissue and cut them into squares about 1 inch by 1 inch. If you have scraps left over from the flower craft, use these. If you end up with some odd shapes and triangles, that is fine.
 |
| Your supplies. The sealer on the right is optional, and you only need one type of white glue. |
 |
| Squares of tissue |
 |
| Paint on some glue and apply squares |
 |
| Squares can overlap a little, like here, or a lot. |
 |
| Painting over the final product |
This craft can NOT be washed. Do NOT use a real candle in it; only use an electronic votive in it!!
Variation: You could also use this technique to make a pretty glass plate to use to serve candy or clean foods. If you make a plate, make sure it is clear glass, and do the mosaic on the BOTTOM of the plate. Again, don't wash it.
If your parents have lacquer or another sealing agent, it could then be hand washable.
Email me a picture of your bowl and I will post it here. mindiphipps@gmail.com
Tuesday, July 31, 2012
Tuesday 31 July 2012 - Quick and Easy Sugar Fudge
Today's activity - Quick and Easy Sugar Fudge
This is a microwave recipe, you don't need to cook!
Ingredients:
1 lb. box powdered sugar
1/2 cup cocoa powder
1/4 cup milk
a pinch of salt (pour a little salt in your clean hand, then take a pinch of it to use. Throw the rest away)
1/4 lb. butter or margarine (1 stick)
1 teaspoon vanilla
(optional) 1/2 cup chopped walnuts
You will also need a pie plate and wax paper, a big spoon and a spatula, and a microwaveable bowl.
1. Cut a square of wax paper that is slightly bigger than the pie pan. Put it into the pan. It will not stay in place, but that's okay, once the fudge is in there, it will keep it in.

2. In a microwave safe glass bowl, add the powdered sugar, cocoa, milk, salt and butter Microwave on high for 2 minutes. Then take it out and stir to get it all pretty smooth. While you are mixing, make sure to scrape the bottom and get all the sugar there mixed in. If there are still some little balls of sugar, you can try to crush them against the side of the bowl, but it's okay if there are still some balls or sugar in there.
3. Add in the vanilla, and the nuts if you want to have them. Mix well.
4. Pour the fudge into the pie plate with wax paper in it. Be careful as it starts to go in that the wax paper doesn't slide out of the pan. Use a spatula to try to get it all out of the bowl. Put the pie plate in the fridge or freezer until the fudge is solid.
5. Cut it into little pieces and eat it!

This is a microwave recipe, you don't need to cook!
Ingredients:
1 lb. box powdered sugar
1/2 cup cocoa powder
1/4 cup milk
a pinch of salt (pour a little salt in your clean hand, then take a pinch of it to use. Throw the rest away)
1/4 lb. butter or margarine (1 stick)
1 teaspoon vanilla
(optional) 1/2 cup chopped walnuts
You will also need a pie plate and wax paper, a big spoon and a spatula, and a microwaveable bowl.
1. Cut a square of wax paper that is slightly bigger than the pie pan. Put it into the pan. It will not stay in place, but that's okay, once the fudge is in there, it will keep it in.

2. In a microwave safe glass bowl, add the powdered sugar, cocoa, milk, salt and butter Microwave on high for 2 minutes. Then take it out and stir to get it all pretty smooth. While you are mixing, make sure to scrape the bottom and get all the sugar there mixed in. If there are still some little balls of sugar, you can try to crush them against the side of the bowl, but it's okay if there are still some balls or sugar in there.
 |
| Before microwaving |
 |
| After the microwave, mix and add vanilla |
4. Pour the fudge into the pie plate with wax paper in it. Be careful as it starts to go in that the wax paper doesn't slide out of the pan. Use a spatula to try to get it all out of the bowl. Put the pie plate in the fridge or freezer until the fudge is solid.
 |
| Pouring can be messy, ask for help holding the pan if you need it |
 |
| Use the spatula to scrape the sides of the bowl |
 |
| It may not look pretty, but it tastes pretty great! |

Monday, July 30, 2012
Monday, 30 July 2012 - Hand Shadow Puppets
30 July 2012 - Today's Activity - Shadow Hand Puppets
To make the puppets,
you need to be in a darkened room, although not totally dark. Place a flashlight or desk lamp a few feet from
a wall. Turn it on and make sure it is
pointed at the wall. First, experiment
with the light, make sure it is pointing the right way, check and see how close
or far you need to hold your hands to make the shadows. You should find that if you put your hands
too close to the light (and relatively far from the wall), the shadow will be very
fuzzy. So you will probably want your
hands pretty close to the wall.
 |
| (These come from weheartit.com) |
Here is a guide to some shadows you can make. Can you tell what they are?
 |
| (These ones are from Chatham Chatter) |
 |
| (And these come from Butterfly Rocket.) |
Friday, July 27, 2012
27 July 2012 - "Clock" Card Game
Today's Activity: Solitaire

 I almost never win, but it's fun to have a game you can play
all by yourself. I also play this game
sometimes if I have a deck of cards that I know is missing one card. I deal out
the clock and just have 1 less card in the center. I play until I lose, then I cheat to sort out
all the other cards. At the end, I can
just look at my clock to see what card I am missing
I almost never win, but it's fun to have a game you can play
all by yourself. I also play this game
sometimes if I have a deck of cards that I know is missing one card. I deal out
the clock and just have 1 less card in the center. I play until I lose, then I cheat to sort out
all the other cards. At the end, I can
just look at my clock to see what card I am missing
Solitaire means a card game you can do alone. This is a super-easy solitaire card game
called "Clock." First, get a
deck of cards and make sure there are no Jokers in it. Then, you are going to lay out the cards in
the shape of a clock, 4 in each pile.
The top pile is like where 12:00 is, the bottom pile is a 6:00,
etc. The 4 extra cards go in the middle. Each pile will be where you put the numbers
that match with that time. For example,
if you turn over a 3, you will put it on top of the pile at 3:00.

Turn over the BOTTOM card from the pile in the middle of the
clock. Look at it, and put it on top of
the pile for that time, for example a 3 goes on 3:00. Then take the bottom card from the 3:00 pile
and put it where it belongs. Jacks go to
11:00, Queens go to 12:00, and Kings go to the middle. The game ends either when you put the last
King on the center pile and there are no uncovered cards to move (you lose), or
when you have all cards showing and the last card is a King (you win!).
One thing: When you
lose, just peek under the piles that have an uncovered card. If that card should go in the same pile, you
can turn it over. If all the remaining
uncovered cards are actually in their own piles, you win after all!!
Here is a picture of a partially played game. First of all, it is a Disney World deck of cards, so the Jacks, Queens, and Kings have pictures of rides on them instead of the figures. As you can see, I have uncovered all the
Jacks. I already peeked under my 6 and 9
pile to make sure that the last 6 or 9 isn't under there. I haven't found any 8s yet. Aces are used for 1:00. (By the way, I lost the game on the very next
card, it was the last King)

(Did you know that that is a good use for your Jokers? If you are missing a card, just take a Joker
and draw the number and suit you need on it and add it to your deck)
NO NEW POSTS UNTIL MONDAY! See you then!
NO NEW POSTS UNTIL MONDAY! See you then!
Thursday, July 26, 2012
26 July 2012 - Tissue Flowers

To do this craft, you will need the following items: 2 sheets tissue paper, the kind you use to
wrap a present (colored would be good), pipe cleaners and scissors. We will use the tissue for other crafts in
the future, so don't use up all of your supplies today!
Lay out your two sheets flat so they are perfectly stacked. Fold them in half and cut the side so you
now have 4 sheets. Then fold the 4
sheets over and cut the folded side. Now you
have 8 sheets.

Working the shorter end, make a fold about 1 inch wide. Turn the stack over, then fold that flap over
again. Turn the stack over and fold
again. Keep going until the whole stack
is folded. At this point, you could use
it as a fan! But we are going to keep going. Make sure your folds look like mine; if you
ended up with something like a tube, it is not right.

Using your scissors, round off the ends. Fold the fan in half, make a crease, and open
it back up. Then cut a little
"V" on each edge of the crease (see picture). By the way, you don't really have to do any of the cuts; it will work out even if you don't.


Place a pipe cleaner under the middle of the tissue with
about 2 inches sticking out on one side, and the rest on the other. Fold the short end of the pipe cleaner over
the top of the tissue and twist it closed.


Hold the tissue by the pipe cleaner. Spread out the tissue so it forms a semicircle on each side of the pipe cleaner (it will be like a bumpy plate). You don't have to keep it open, but you need to kind of stretch each side so they are not so tightly closed. Gently pull up one layer of the tissue from one side of the pipe cleaner. Carefully pull it upright. Then do the same for the top layer on the other side. Now you will do the next layers on both sides, and keep going until the whole flower is puffed. You can twist the pipe cleaner stem onto a pencil or dowel to make it stand up better. You can put one flower into a vase, or make a whole bunch.
 |
| This is with one piece of tissue on one side of the flower puffed up. |
 |
| Now I did the first layer of tissue on both sides. |
 |
| All done! |
Variations: You can
use fewer layers to make a smaller flower.
Also, you can use more colors, or fewer colors. After cutting the layers, you can rearrange
the order of the colors to get a specific look.
Have fun!!
Variation: To make a
tissue ball (that you could use as a Christmas ornament), follow all the steps
above until you get to the pipe cleaner.
Use a string instead of the pipe cleaner to hold it together. Gently pull up one layer from the top and
puff it up. Do the other side too. Then go to the bottom of the tissue and puff
the bottom layer down. Keep alternating
top and bottom sheets and you will end up wth a ball (make sure you have at least
8 layers to make the ball, 12 layers would be better).
Email me a picture of your flower(s) and I will post them
here! mindiphipps@gmail.com
Subscribe to:
Comments (Atom)